This post may contain affiliate links. Please read our privacy policy.
[pinit]
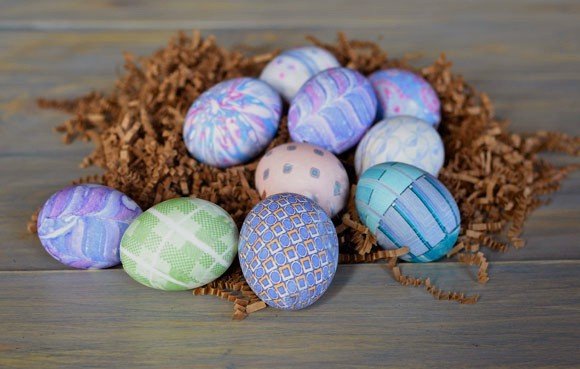
Everyone loves coloring eggs for Easter. Its messy, fun, creative, and the results are always surprising. But, after dip-dying every year I thought this year it would be fun to switch it up. After scouring Pinterest and other craft blogs I decided to try to silk-dyed eggs, and I’ve also compiled a list of other really cool options.
I found the idea for silk dyed eggs on Our Best Bites, and never thought it would turn out as cool as they said or even work. Totally wrong! These are so pretty that you will want to keep them out year round. The key to this project is using the brightest and boldest patterns and colors you can find…ugly ties/patterns=beautiful eggs. Make sure you visit the thrift store vs. the fabric store. Better selection (of ugliness) and much much cheaper.
Silk dyed eggs should not be eaten since the dye used in fabric is not food safe. Blowing out the eggs will keep them from spoiling and you’ll be able to display them for years to come. Thread twine or string through the egg to make them into Easter ornaments! How to Blow out Eggs
What You Will Need:
- Eggs (white shells will work best)
- A clean screw, paper clip, and straw (to empty the eggs)
- 100% Silk Scraps (ties, handkerchiefs, bandanas…etc).
- Light Colored Cotton Fabric, such as an old sheet
- White Vinegar
- Rubber Bands or String
- Large Pot or Sauce Pan
- Scissors
How to Assemble:
- Blow out the eggs…How?
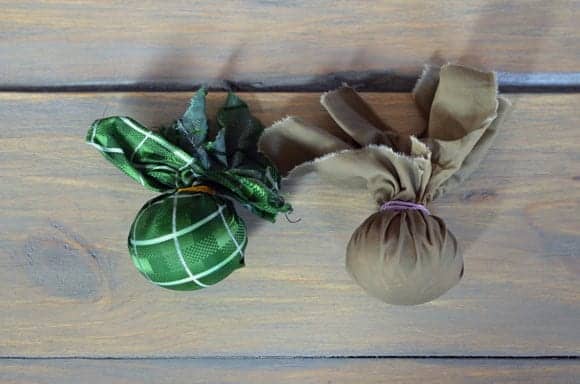
- Cut squares of silk large enough to cover the egg (4×4 inch square should be good)
- Pull up around egg, with the brightest side of the fabric against the egg, and tie with string or rubber band
- Tie a second layer around the egg with the light cotton fabric, this helps keep the silk against the egg
- Place in pan and cover with at least 2 inches of water and 1/4 cup of white vinegar
- Empty eggs will float so turn often or help keep submerged by putting a plate on top of them
- Simmer eggs for 20-25 minutes
- Remove from water and let cool
- Gently remove fabric and get ready to be AMAZED!
Here are some more beautiful and creative ideas for egg decorating!
Natural Egg Dyes from My Baking Addiction
DIY Washi Tape Easter Eggs from Lovely Indeed
Stenciled Eggs from Martha Stewart
Tissue Paper Egg Dyeing from Moments of Mommyhood
Glittered Eggs from Martha Stewart


We tried these today and none of our eggs turned out. There was not even the slightest bit of color transfer. We did exactly what it said to do. I’m puzzled. Any suggestions ?
I’m so sorry these didn’t turn out for you Nichole! Were you able to keep the eggs submerged? They tend to float to the top, which would prevent them from coloring. Let me know if I can do anything else for you!
We made these last year! I found silk ties at Goodwill for $1 each and the boys loved them! My one caution is that I found a light yellow tie with airplanes, and one of my sons was so excited to use it. Unfortunately, the yellow was too light to transfer and the planes didn’t come out very well either. His was the only egg that didn’t work (the other three had dark ties). He was devastated! I would just recommend sticking with dark fabrics. Luckily we had planned for one silk tie egg and one regularly dyed egg so he was able to dye both the old-fashioned way.
I must admit that we ate all the eggs. None of my eggs were cracked, and I figured the dye only got on the eggshell. Are people really worried that the dye could get into the egg itself? I never thought of that.
Carol,
I tried a goldish/yellow tie also, didn’t work. The brighter the color the better! Also, I wouldn’t be concerned that you ate the eggs. I just wanted to add it so that everyone knows the dye isn’t labeled food safe. No worries :)
Lindsay, these are spectacular. They are absolutely amazing. I will definitely be trying these tomorrow. Another beautiful idea.
Thank you so much! Let us know how they turn out!
I made these a few years ago and they were outstanding! I found great ties at the thrift shops for dirt cheap too. Might have to do it again this year now that you’ve reminded me of how much fun & how pretty they are. Thanks!
You’re welcome! I already want to make more. I wonder if the dye would transfer to other surfaces…could lead to many more experiments!
All these are so cute! Totally give them a try!
They are so beautiful – as you say, you would want to have them all year round!
Ok! This is crazy!!!! We actually read the instructions like 5 times to make sure we understood what we were reading!
I know! It’s unbelievable that it would transfer that nicely!
We are still amazed by this. Actually mentioned it to our neighbor and she was going to take a look at them. Super creative!! =)
Holy cow! That is so cool, and totally unreal!
That is unreal!!