This post may contain affiliate links. Please read our privacy policy.
Happy Halloween…if you frequent my blog or follow me on Twitter, you may remember me saying that I am not a huge fan of the spooky side of October 31st. I am a BIG baby when it comes to horror movies and haunted houses; instead I choose to celebrate fright night with a super cute dessert.
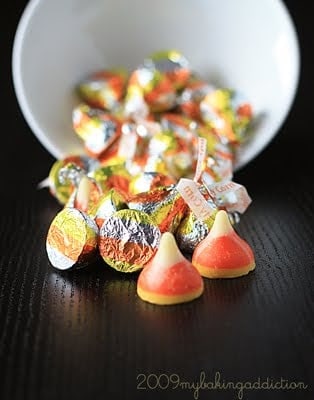
I came across this recipe while browsing the Hershey’s website and I knew it would be perfect for Halloween because my candy dish was already overflowing with Hershey’s Candy Corn Kisses. Plus I am absolutely smitten with it’s candy corn-esque layered effect!
I used these kisses in a previous post for Pumpkin Maple Chip Cupcakes and received quite a few emails and comments asking where I purchased these adorable orange, yellow and white striped candies. I picked them from Target earlier in the month, but have seen them at other places as well.
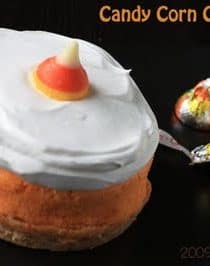
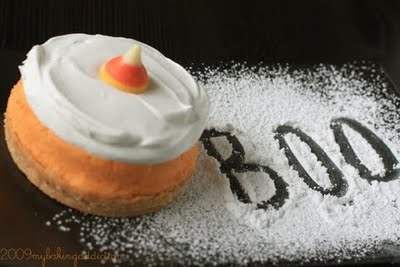
The crust of this cheesecake it absolutely delicious – it maintained a nice crunchy texture. The filling was not my favorite cheesecake texture. It seemed a little more stout and “cheesy” than I like my cheesecakes to be, instead of creamy. If I make this again, I will definitely play with the cheesecake portion of this recipe.
If you can’t find the Hershey’s Candy Corn Kisses in your area, simply dye the batter of your favorite cheesecake recipe orange and top with candy corn!
Thanks so much for stopping by! Have a Spooktacular Halloween!
Candy Corn Cheesecake
Ingredients:
3/4 cup vanilla wafer crumbs(about 20 cookies)
1/2 cup plus 2 tablespoons all-purpose flour, divided
1/2 cup granulated sugar, divided
1/4 cup (1/2 stick) cold butter or margarine
12 HERSHEY’S KISSES Brand Candy Corn Flavored Candies
1 package (8 oz.) cream cheese, softened
2 eggs
1/4 cup milk
1 teaspoon vanilla extract
1/4 teaspoon baking powder
1 cup frozen non-dairy whipped topping, thawed
Additional HERSHEY’S KISSES Brand Candy Corn Flavored Candies, unwrapped
Directions:
1. Heat oven to 350°F. Line 8-inch square pan with foil, extending foil beyond sides of pan. Stir together vanilla wafer crumbs, 1/2 cup flour and 1/4 cup sugar; cut in butter until mixture is crumbly. Press onto bottom of prepared pan.
2. Remove wrappers from 12 candies; place in medium microwave-safe bowl. Microwave at MEDIUM (50%) 1 minute; stir. If necessary, microwave at MEDIUM an additional 10 seconds at a time, stirring after each heating, until candies are melted and smooth when stirred. Beat cream cheese and remaining 1/4 cup sugar until blended. Beat in eggs, milk, remaining 2 tablespoons flour, vanilla and baking powder. Gradually beat about 1/2 cup cream cheese mixture into melted candy; beat this mixture into remaining cream cheese mixture. Pour into prepared crust.
3. Bake 20 to 25 minutes or until center is set. Cool to room temperature. Spread whipped topping over surface. Cover; refrigerate several hours or overnight. To serve, lift dessert from pan using foil. Peel back foil, cut into squares. Serve each square garnished with candy piece. 12 to 16 servings.
Notes: I used (3) 4 inch springform pans instead of the 8×8 inch pan. These baked for 17 minutes until the center was set. I also added a tiny bit of orange gel food coloring to slightly intensify the shade of orange.
- from Hershey’s
All images and text ©Follow Jamie on Instagram. We love to see what you're baking from MBA! Be sure to tag @jamiemba and use the hashtag #mbarecipes!
[pinit]


Hey, Jamie! I think the reason the texture was off is because once the cheesecake cools the kisses harden again. The same thing happened to my pumpkin spice (kisses) swirled brownies. It actually made the brownies texturally more interesting and yummy (in my opinion) but I can see why it wouldn't be as good in cheesecake.
Btw, I liked that last photo!
~ingrid
How cute! Next year…