This post may contain affiliate links. Please read our privacy policy.
Many months ago I was a Daring Baker; I loved testing my skills in the kitchen and baking along with some of the most talented bakers in the blogosphere. However, life got busy and I become a dropout, yep…a Daring Bakers dropout. I still drool over the recipes once they hit foodgawker and tastespotting, but now I bake at my own pace…I am so not good with deadlines!
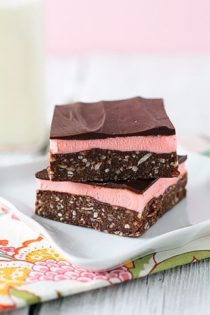
When I saw this month’s recipe for Nanaimo Bars I knew they would be in my baking future, but after seeing Barb’s, I knew they were next on my list! The striking layered effect reminded me of the Brach’s Neapolitan Squares that I loved as a kid. I vividly remember those little coconut candies from the bulk section of the grocery store. My dad and I would always leave with a giant bag, eating most of them on the drive home!
These lovely layered bars are a Canadian dessert that originated in Nanaimo, British Columbia. If you are interested in the history of this delectable treat, click here to be taken to the city of Nanaimo’s website. If these bars don’t make you want to visit Nanaimo, the photos of the city certainly will…seriously what a gorgeous place to live! This website is also where I found the recipe that I used for my Nanaimo Bars; I simply added a little pink gel dye to the center layer to give ‘em a little Valentine’s Day flair! After all this research, I still had no clue how to pronounce Nanaimo, so I continued my research and found the pronunciation with audio here, simply click the red speaker looking thingy! I hope this this little tid-bit makes you sleep better tonight! These bars are positively delicious, I will definitely be making these again and again. They are so easy and would be a prefect recipe to have your kiddos help with in the kitchen!
Looking for other Valentine’s Day ideas? Check out these gorgeous Chocolate Caramel Cookies from Two Peas and Their Pod and these cute Valentine’s Day Cut-Outs from GoodLife Eats! YUM!
Nanaimo Bars
Ingredients:
Bottom Layer
1/2 cup unsalted butter
1/4 cup sugar
5 tablespoons cocoa
1 egg beaten
1 1/4 cups graham wafer crumbs
1/2 cup finely chopped almonds
1 cup coconut
Second Layer
1/2 cup unsalted butter
2 tablespoons and 2 teaspoons cream
2 tablespoons vanilla custard powder (such as Bird's Custard Powder; I used cook and serve vanilla pudding powder)
2 cups icing sugar (confectioners' sugar)
Third Layer
4 squares semi-sweet chocolate (1 oz. each)
2 tablespoons unsalted butter
Directions:
Bottom Layer
1. Melt first 3 ingredients in top of double boiler.
2. Add egg and stir to cook and thicken. Remove from heat.
3. Stir in crumbs, coconut, and nuts.
4. Press firmly into an ungreased 8" x 8" pan.
Second Layer
1. Cream butter, cream, custard powder, and icing sugar together well.
2. Beat until light.
3. Spread over bottom layer.
Third Layer
1. Melt chocolate and butter over low heat. Cool.
2. Once cool, but still liquid, pour over second layer and chill in refrigerator.
3. Slice with a warm knife when ready to serve.
Notes:
- I simply added a little pink gel dye to the middle layer to make it pink.
- I used the microwave for the bottom layer and the third layer; it worked beautifully.
- Make sure you use a warm knife to slice the bars or the chocolate layer may separate.
Recipe is from: http://www.nanaimo.ca/EN/main/visitors/NanaimoBars.html
All images and text ©Follow Jamie on Instagram. We love to see what you're baking from MBA! Be sure to tag @jamiemba and use the hashtag #mbarecipes!
[pinit]


Wow! Those look beautiful and so delicious! Perfect for Valentine’s!
P.S I love the new look of the blog!
I just discovered your blog, through one of my friend’s (http://lizandbeccabake.blogspot.com/).
It’s inspiring, both as a baking/cooking blog AND as a photography blog. You’re photographs are beautiful! And I can’t wait to test some of your recipes.
Thanks!
Jaymie Kate
Love the pink! So fun for Valentine’s day and thanks for the shout out my friend!
These bars sound so yummy, I love the pink centers! I am not so great with the deadline thing either….at least you found the time to make these beautiful bars, just in time for Valentine’s Day!
Hey, thanks for the pronunciation link! I’ve seen these pop up on DB blogs, but was never sure how to pronounce it, and didn’t think to check the interwebs.
Wow, we could all start a DB drop out club – I’m one too. These bars are gorgeous.
Great photo Jamie! Thanks so much for all the information about the history of these bars. I’ve seen them all over the internet due to the Daring Bakers, but didn’t know anything about them. Yours look so wonderful and perfectly festive :)
I am a Daring Baker dropout, too. :( But the worst part is that I joined, and never made ANYTHING! I’m terrible.
These on the other hand, look wonderful!
Well, you know I love them and the pink is a nice touch for Valentine’s Day Jamie. I used to love those layered Brach’s candies; the only thing I ever thought of getting when I passed those displays; thanks for the memory!
I am a DB Dropout, too! :( This look beautiful. Love the pink! :) ya done good, kid….