This post may contain affiliate links. Please read our privacy policy.
I’m fairly certain that I’ve discussed my lack of love for the great outdoors, so it’s safe to say you’ll never hear me writing about long hikes in the woods or camping anywhere other than on a deck chair at a five star resort (Hey, I can dream, right?). Not to say that I am not fond of the fresh air and scenery, I just like to keep a screen between me and the bugs.
Needless to say, I don’t last long at picnics in the park or anywhere outdoors for that matter. Usually an annoying fly or buzzing bee will send me into a fit within 20 minutes and I’ll sit there contemplating my escape route or the idea of eating in my air conditioned vehicle.
Problem is, I am a big pan of picnic food. Hot dogs, potato salad, watermelon, and No Bake Cookies rank pretty high on my hierarchy of good eats, so I’ll usually suffer through it as long as I am armed with cold bottle of water and a fly swatter.
Then, a couple of friends came up with the idea of a virtual picnic. A Virtual Picnic for the Planet was totally doable because well, it doesn’t require me hanging outside! Plus, I think our planet is pretty rocking and I totally dig the idea of coming together to make a difference.
The Nature Conservancy has a website that is devoted to Picnic for the Planet. They have a Meet Up page which allows you to connect with people in your area to plan your Picnic for the Planet. They also describe 5 Easy Actions that are good for the Earth and help you to reduce your impact on the Earth.
Eat Smart
Be proactive, know where your food comes from and who it impacts.
Eat Local
Take advantage of your farmer’s market. Try to purchase food that is in season and locally grown.
Eat Sustainably
Eat sustainable seafood — one of the only things that we eat that we still get from the wild.
Eat Green
Eat more fruits and vegetables — it’s good for your health and the planet’s
Eat Out
Join us in the Picnic for the Planet!
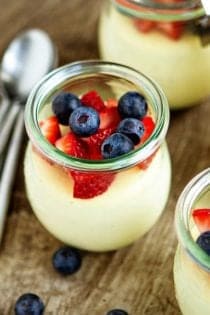
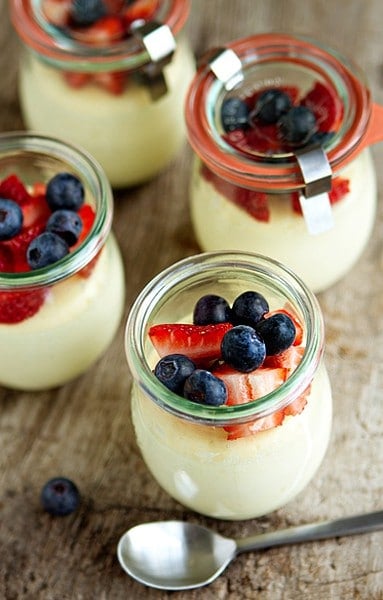
For today’s Virtual Picnic for the Planet, I have made Cheesecakes in a Jar with fresh mixed berries. These Cheesecakes in a Jar are simple, portable, decadent and truly couldn’t be any more adorable.
I simply scooped my cheesecake batter into small canning jars, baked them in a water bath and topped with fresh berries. The lids allow these individually portioned desserts to be placed into a cooler, so it makes them the perfect picnic dessert to wow a crowd!
I would love to hear about your plans for this Earth Day. Will you be picnicking?
Make sure to check out the Virtual Picnic for the Planet link up below to see all the great recipes my fellow picknickers came up with. You’ll have your Picnic for the Planet menu figured out faster than you can say bug spray!
Simple Bites | Pressed Sandwiches
My Baking Addiction | Mixed Berry Cheesecakes in a Jar
Bluebonnets & Brownies | Nanny’s Potato Salad
Gourmande in the Kitchen | Honey Ginger Lemonade
Dine & Dish | Sangria
Add A Pinch | Herbed Tortellini Salad
Bakers Royale | Fruit Recipe Roundup
Three Many Cooks | Black and White Caviar
Food for My Family | Homemade Potato Chips and Avocado Ranch Dip
Sugarcrafter | Apple Hand Pies
Tickled Red | Tangy Potato Salad
What’s Cooking with Kids | Kale Chips
Confessions of a Cookbook Queen | Mini Lemonade Cakes
TidyMom | Picnic Pies in a Jar
Cheesecake in a Jar

Ingredients:
- ½ cup plus 2 tablespoons granulated sugar
- zest of one lemon
- 2 packages cream cheese, 8 oz each; room temperature
- 2 large eggs; room temperature
- ¼ cup heavy cream
- 1 ½ teaspoons pure vanilla extract
- 1 cup fresh berries
Directions:
- Preheat oven to 350°F.
- Begin to boil a large pot of water for the water bath.
- In the bowl of your stand mixer fitted with your paddle attachment, combine the sugar and lemon zest and mix until the sugar is moistened and fragrant.
- Add in the cream cheese and cream together until smooth.
- Add eggs, one at a time, fully incorporating each before adding the next. Make sure to scrape down the bowl in between each egg.
- Add heavy cream and vanilla and mix until smooth.
- Pour batter into canning jars until about ¾ of the way full.
- Place jars into a larger pan and pour boiling water into the larger pan until halfway up the sides of the jars.
- Bake 25 to 30 minutes, the edges will appear to be set, but the center will still have a little jiggle to it.
- Carefully remove the cheesecake jars from the water bath and place on a cooling rack to cool completely.
- Once the cheesecakes are completely cooled, place them into the refrigerator for at least 5 hours.
- Top will fresh berries and serve.
Notes:
- For glossy berries, simply add 1 tablespoon of hot water to ¼ cup apricot preserves. Blend until combined and thinned out. Place the berries in a bowl and gently brush and toss the berries with the apricot and water mixture.
- If you are not a fan of lemon, simply omit the zest.
- If you are missing the graham cracker crust, serve with graham sticks.
- The jars pictured above are Weck (7.4 ounce) Tulip Jars.
Follow Jamie on Instagram. We love to see what you're baking from MBA! Be sure to tag @jamiemba and use the hashtag #mbarecipes!


Re: Eat Local
Take advantage of your farmer’s market. Try to purchase food that is in season and locally grown.
>> Be advised that produce on sale at your local farmer’s market may not actually *be* local, even if it is in season. I live in a rural Ontario and we’re just as likely to find BC produce in the farmer’s market.
At least grocery stores are obliged to indicate where produce is from. Sadly, mine prefers to stock produce from Mexico over locally grown.
And then of course when you’re talking about “fresh” food, well, there are techniques including chemicals that allow produce to appear “fresh” as long as a year. My rule of thumb: if it smells like cardboard instead of tomato, it will taste like cardboard.
These look awesome. Couple of questions for you. If you wanted to do a graham cracker crust at the bottom, would you be able to bake that before the cheesecake and would you need the water bath? And if I used 4oz jars instead do I cut the baking time in half?
Meera-
The water bath helps to ensure that the cheesecakes cook in an even and gentle manner. If you use smaller jars, I would recommend that you start checking the cheesecakes after about 15 minutes. You’ll want the edges to look set, but the center to have a little jiggle to it. Hope this helps.
-Jamie
made these yummy “cheese cakes in a jar” sold them for a fund raiser for the vol. fire dept. here. sold for 5.00 each put only cherry on top with some sauce need to put a lid on used 3oz canning jars. sold all i made. and took orders for 30 more wow!!!!! people loved them
Iree-
So glad to hear you enjoyed this recipe! Thanks so much for sharing your experience.
-Jamie
Hi Jamie, what kind of cream cheese did you use? Block cream cheese or spread one ?
Thanks
Kat-
I used the 8-ounce blocks. Have a great day.
-Jamie
This is probably a dumb question, but when you say bake, do you mean in the waterbath, like boil the water around the jars for 25-30 minutes, or put the whole thing in the oven and bake it, waterbath, jars, and all? I haven’t done much canning, but I do have a waterbath canner.
Shannon-
To prepare a water bath for the cheesecake jars, put your filled jars in a large pan and add enough boiling-hot water to reach about 1/3 of the way up the jars. I hope this helps!
-Jamie
looks so tasty!
Can you send me one of them? :D
I am so stealing this idea! I know that cheesecake freezes well so, I can see doing this.Portion control is not a bad thing for me. And it is just right for my husband and I.They would have to be topped with fruit after defrosting but YUMMY!!
instead of using cheesecake that has to be cooked how about the box ones that get cold in the fridge make up your crumble crust and add it as you want and you can also put your fruits n and fridge it and eat it out of the cooler using the same jars…..yumm yumm
Corinna, I had the exact same thought, use the no-bake cheesecake in the box! If you tried it, let me know how it turned out.
and by toss i mean toss in the recycle bin!
think you could use baby food jars? would love to put this in hubby’s lunch and he wouldn’t have to bring the jar back. he could just toss it and the serving size would be perfect.
Dana-
I am uncertain as to if baby food jars are heat safe, so I can’t say whether this will work or not. Sounds super cute though and it’s a great way to use those jars!
-Jamie
Can I use graham crackers for a crust with this preporation?
Hi there – you certainly can.
– Jamie