This post may contain affiliate links. Please read our privacy policy.
I’m fairly certain that I’ve discussed my lack of love for the great outdoors, so it’s safe to say you’ll never hear me writing about long hikes in the woods or camping anywhere other than on a deck chair at a five star resort (Hey, I can dream, right?). Not to say that I am not fond of the fresh air and scenery, I just like to keep a screen between me and the bugs.
Needless to say, I don’t last long at picnics in the park or anywhere outdoors for that matter. Usually an annoying fly or buzzing bee will send me into a fit within 20 minutes and I’ll sit there contemplating my escape route or the idea of eating in my air conditioned vehicle.
Problem is, I am a big pan of picnic food. Hot dogs, potato salad, watermelon, and No Bake Cookies rank pretty high on my hierarchy of good eats, so I’ll usually suffer through it as long as I am armed with cold bottle of water and a fly swatter.
Then, a couple of friends came up with the idea of a virtual picnic. A Virtual Picnic for the Planet was totally doable because well, it doesn’t require me hanging outside! Plus, I think our planet is pretty rocking and I totally dig the idea of coming together to make a difference.
Final")
The Nature Conservancy has a website that is devoted to Picnic for the Planet. They have a Meet Up page which allows you to connect with people in your area to plan your Picnic for the Planet. They also describe 5 Easy Actions that are good for the Earth and help you to reduce your impact on the Earth.
Eat Smart
Be proactive, know where your food comes from and who it impacts.
Eat Local
Take advantage of your farmer’s market. Try to purchase food that is in season and locally grown.
Eat Sustainably
Eat sustainable seafood — one of the only things that we eat that we still get from the wild.
Eat Green
Eat more fruits and vegetables — it’s good for your health and the planet’s
Eat Out
Join us in the Picnic for the Planet!
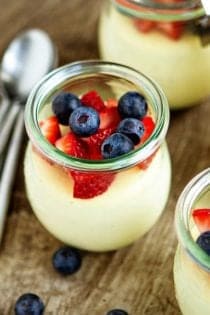
For today’s Virtual Picnic for the Planet, I have made Cheesecakes in a Jar with fresh mixed berries. These Cheesecakes in a Jar are simple, portable, decadent and truly couldn’t be any more adorable.
I simply scooped my cheesecake batter into small canning jars, baked them in a water bath and topped with fresh berries. The lids allow these individually portioned desserts to be placed into a cooler, so it makes them the perfect picnic dessert to wow a crowd!
I would love to hear about your plans for this Earth Day. Will you be picnicking?
Make sure to check out the Virtual Picnic for the Planet link up below to see all the great recipes my fellow picknickers came up with. You’ll have your Picnic for the Planet menu figured out faster than you can say bug spray!
Simple Bites | Pressed Sandwiches
My Baking Addiction | Mixed Berry Cheesecakes in a Jar
Bluebonnets & Brownies | Nanny’s Potato Salad
Gourmande in the Kitchen | Honey Ginger Lemonade
Dine & Dish | Sangria
Add A Pinch | Herbed Tortellini Salad
Bakers Royale | Fruit Recipe Roundup
Three Many Cooks | Black and White Caviar
Food for My Family | Homemade Potato Chips and Avocado Ranch Dip
Sugarcrafter | Apple Hand Pies
Tickled Red | Tangy Potato Salad
What’s Cooking with Kids | Kale Chips
Confessions of a Cookbook Queen | Mini Lemonade Cakes
TidyMom | Picnic Pies in a Jar
Cheesecake in a Jar
Ingredients:
- ½ cup plus 2 tablespoons granulated sugar
- zest of one lemon
- 2 packages cream cheese, 8 oz each; room temperature
- 2 large eggs; room temperature
- ¼ cup heavy cream
- 1 ½ teaspoons pure vanilla extract
- 1 cup fresh berries
Directions:
- Preheat oven to 350°F.
- Begin to boil a large pot of water for the water bath.
- In the bowl of your stand mixer fitted with your paddle attachment, combine the sugar and lemon zest and mix until the sugar is moistened and fragrant.
- Add in the cream cheese and cream together until smooth.
- Add eggs, one at a time, fully incorporating each before adding the next. Make sure to scrape down the bowl in between each egg.
- Add heavy cream and vanilla and mix until smooth.
- Pour batter into canning jars until about ¾ of the way full.
- Place jars into a larger pan and pour boiling water into the larger pan until halfway up the sides of the jars.
- Bake 25 to 30 minutes, the edges will appear to be set, but the center will still have a little jiggle to it.
- Carefully remove the cheesecake jars from the water bath and place on a cooling rack to cool completely.
- Once the cheesecakes are completely cooled, place them into the refrigerator for at least 5 hours.
- Top will fresh berries and serve.
Notes:
- For glossy berries, simply add 1 tablespoon of hot water to ¼ cup apricot preserves. Blend until combined and thinned out. Place the berries in a bowl and gently brush and toss the berries with the apricot and water mixture.
- If you are not a fan of lemon, simply omit the zest.
- If you are missing the graham cracker crust, serve with graham sticks.
- The jars pictured above are Weck (7.4 ounce) Tulip Jars.
Follow Jamie on Instagram. We love to see what you're baking from MBA! Be sure to tag @jamiemba and use the hashtag #mbarecipes!


They look so cute! But sadly I don’t have an oven. :( is there an alternative?
Um 406 calories each, no thanks, but they look delicious
Jennifer,
They’re dessert, and thus meant to be enjoyed sparingly. Compared to the average restaurant dessert, I feel that’s quite reasonable.
– Jamie
These are the cutest cheesecakes ever! So clever putting them into jars. I’m sure that helps in keeping them fresher longer. Although I doubt that’s a problem!
I am making these at an elevation of about 7000 ft. I don’t know if that is affecting them or what else it could be, but they tend to puff up real big and crack. Did some reading online and took a suggestion to turn the temp down to 250… now they take forever to bake…. any suggestions?
Thx so much
George-
Unfortunately, I have absolutely zero experience baking at high altitude. Here is a guide from King Arthur Flour that may be useful. I hope this helps. https://www.kingarthurflour.com/recipe/high-altitude-baking.html
-Jamie
I LOVE this I just cannot find the adorable jars in the picture did anyone else get them?
Hi Vanessa,
Those jars are from a company called Weck. You can order them online, or they’re available in some national chains like Crate & Barrel.
– Jamie
I followed the directions but my jars cracked in the boiling water before I even put them in the oven :-(
Hi Perplexia,
If you chilled your jars at all, or it was cold in the room before you added them to the boiling water, that is simply what glass will do. You must take care that the jars are room temperature before adding them to boiling water.
– Jamie
I may be a total idiot or just ignorant because I’ve never made cheesecake but these look wonderful! Ignore the run-on sentence. My question is, why pre-heat the oven? Do you put the pan with water and the 3/4 filled jars in the oven??
I appreciate the patience with my ignorance.
Tracy-
Hi! Yes, per step one of the directions, you will preheat the oven to 350°F. You will then place the jars in the pan and pour the water in to surround the jars before placing the pan into the oven. Just be careful – the pan and water will be very hot! Thanks so much for stopping by – have a great day!
-Jamie
These are Awesome. I gave them as gifts at Christmas BIG HIT! husband hinted last night he sure would like to have them again. Going to bake a double batch today. I am going to be so popular!
This is a genius way to serve cheesecake, can’t wait to try these, they look so cute too1
Love this idea. But can you tell me where I can get hold of these cute little jars? Thanks!
Lauren-
Hi! The jars are mini Tulip Jars from Weck – https://secure.cnchost.com/weckjars.com/productsDetail.php?category=4 I hope this helps.
-Jamie