This post may contain affiliate links. Please read our privacy policy.
While scouring the internet and craft stores for Halloween inspiration, I realized that most Halloween DIYs were a little too “crafty” for me. Without little ones at home, they’d most likely be tossed in the trash on November 1st. I wanted to make something that could be kept from year-to-year and would appeal to the big kids too.
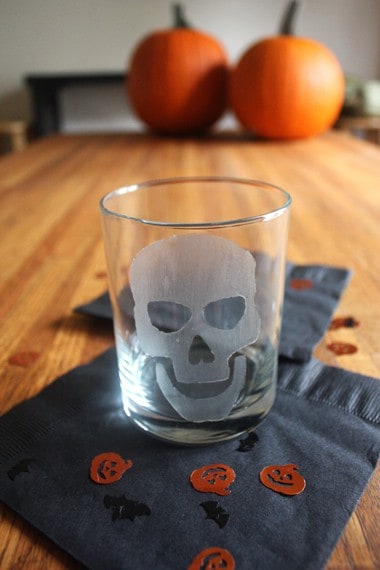
It took some trial and error, but I think the effort is definitely worth it. Etched Halloween glasses are admittedly something that requires concentration to figure out. Making sticker stencils helped a ton in getting the design on the glass. They made it so much easier, we created a few stencils for you – because take my word for it, free-hand is definitely NOT the way to go!
Halloween Etched Glasses
What You Will Need:
- Glasses (I found mine for 88 cents a piece at Walmart. Or try the dollar store).
- Small Paint Brush
- Frost Etching Paint Martha Stewart Crafts brand, found at Amazon or Michaels
- Printable Sticker Sheet Paper
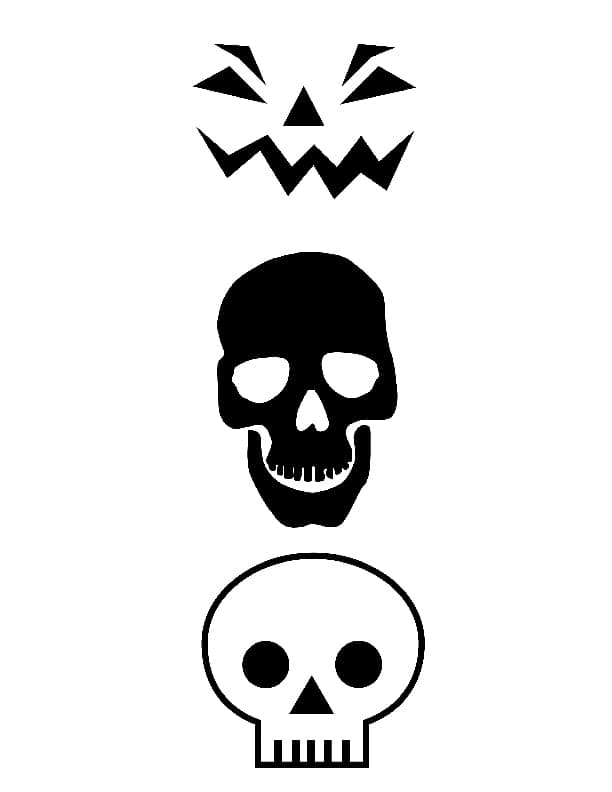
- Halloween designs, look for free ones online or use the ones provided. Just try to stick to simple lines, a complicated design will be too hard to cut out.
- Scrapbooking Pen Knife
- Cutting Board
How to Assemble:
- Print designs on the sticker sheet. Do a test print first on regular printer paper to make sure the designs are the correct size
- With pen knife, carefully trace the designs, cutting out the part that you want painted.
- Peel stickers off paper and apply to the cleaned and dried glasses.
- Paint a light layer of the frost etching paint in the stencil that you have cut out of the sticker paper.
- Let the paint dry completely and gently remove the stickers (there will be a little bleeding under the stickers…don’t worry!!)
- Using the pen knife scrape off any paint that might have bled under the stickers and straighten up the edges of the design.
- Following the directions on the Etching Paint, bake the glasses to set the designs.
Now you have spooktacular Halloween glasses! Whatever should you do with them? Fill them with a delicious cocktail that tastes like you’re drinking creamy pumpkin pie? Great idea! Stay tuned later this week for a delicious and festive pumpkin cocktail.
*The design shows up more in person, but you can also tint your etching paint with other glass paint. I think it would look really cool tinted with black paint!


I can’t believe I saw this post on Pinterest!! I have just made a committment to change all our coffee mugs to these great clear mugs I adore….but when everyone has the same mug at a brunch or party, it’ll be easy to loose your mug…so I wanted to etch numbers on the mugs! Thanks for the tutorial!! Do you know: is it dishwasher safe or will it come off?
Megan,
I would stick to hand washing just to be safe. I think I saw number stencils in the Martha Stewart section at Michael’s!
Lindsay
oh, would that make my life easier!! thanks for the tips!!
Love this idea and I’ll be trying it pronto! Wish I had seen something like this before, a set of etched glasses would be a great prize for our annual Halloween costume party! Exching is so fun, I really need to do it more, thank you!
Andrea,
They would be a great prize! Maybe next year!
Lindsay
What a cute and easy idea! I love how your glasses turned out!
Mercedes,
Thank you! Have a great day!
Lindsay
I love this cute & affordable idea! I was born to entertain and it’s always hard to stay on a budget!! I can’t wait to try these out! Thank you for sharing!
Lynn,
Thanks so much! Let us know how they turn out!
Lindsay