This post may contain affiliate links. Please read our privacy policy.
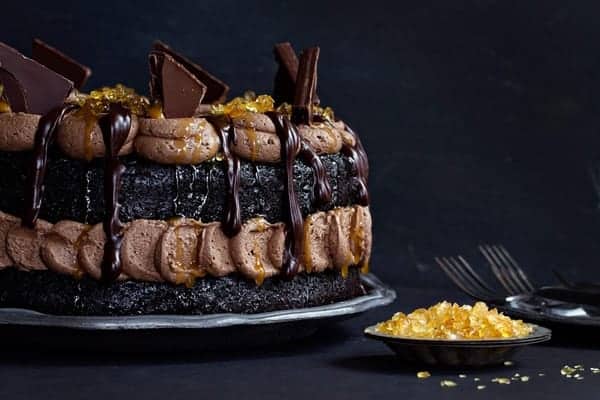
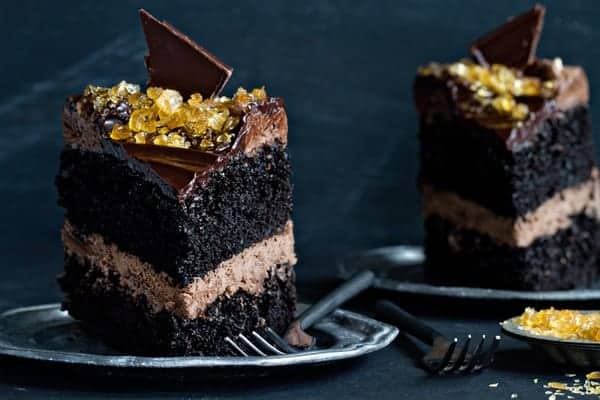
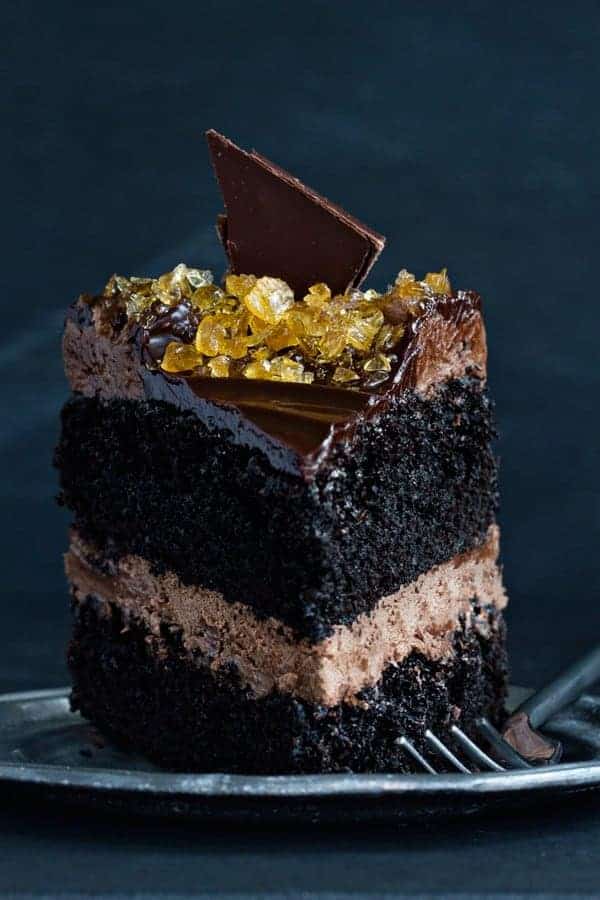
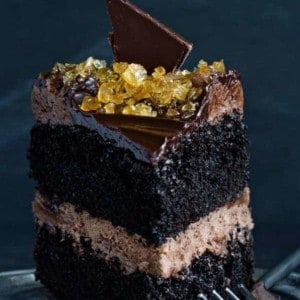
This Double Chocolate Salted Caramel Cake is rich, delicious and the perfect cake for a chilly, fall day. Serve it with a cup of your favorite coffee for truly delightful dessert.
This post is sponsored by Adobe. All views and opinions are 100% my own. Thank you for continuing to support the brands that make My Baking Addiction possible.
I started baking years and years ago, while working through my teaching career. There’s something uniquely soothing about piping frosting, coming home to bake a batch of chocolate cupcakes, or trying a new recipe for the first time – I’ll tell you that much for free.
I still find piping frosting to be extra therapeutic and I was really in the mood for a delicious, decadent, beautiful chocolate cake, and here she is.
The base recipe for this cake is one of the most popular recipes on my site, find it here! I decided to update it a bit with a salted caramel twist which paired perfectly with its dark, moist, rich and incredibly decadence flavors. Seriously, it’s the best chocolate cake I’ve ever tasted and getting creative with the frosting and toppings is one of my favorite parts about baking.
Today, I’m going to walk you through the process of shooting this Double Chocolate Salted Caramel Cake. We’ll discuss gear, props, ingredients, and photo editing so you can see exactly what I did.
I love photography because I feel as though it is constantly evolving and it’s one facet of blogging that keeps me learning. From updated equipment and software to shooting on new surfaces, photography never leaves me feeling bored.
I photograph food several times a week, sometimes the process is pretty simple, but other times, it’s not that easy. Especially when you use natural light for photos but happen to live in Ohio and haven’t seen the sun for days.
I woke up the morning of the shoot and stood in my prop room while sipping a caramel latte until I had a game plan. Step one was switching from a lighter background and props to an ultra-moody set-up, which by the way, was totally indicative of personality that morning. I gathered everything and decided that no matter what, the photos were happening and that they did.
THE DETAILS
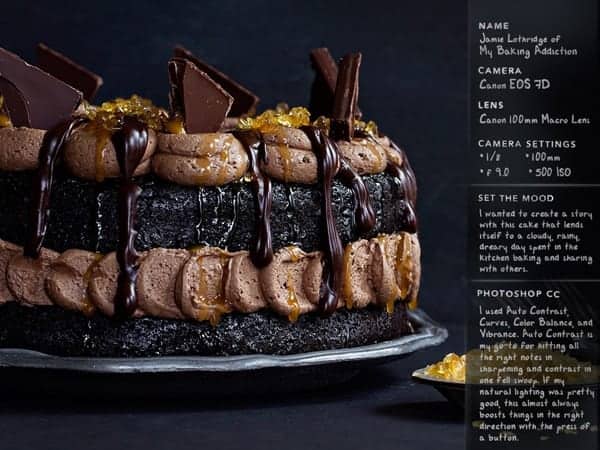
CAMERA: Canon 7D
LENS: Canon 100mm Macro Lens
ISO: 500
SHUTTER SPEED: 1/8
APERTURE: f/9.0
WHITE BALANCE: Auto
THE SHOOT
As I mentioned earlier, I ended up using a dark surface and background to shoot this Double Chocolate Salted Caramel Cake. And although the cake is dark as well, it still seems to really pop even though the overall tone of the photo is quite monochromatic.
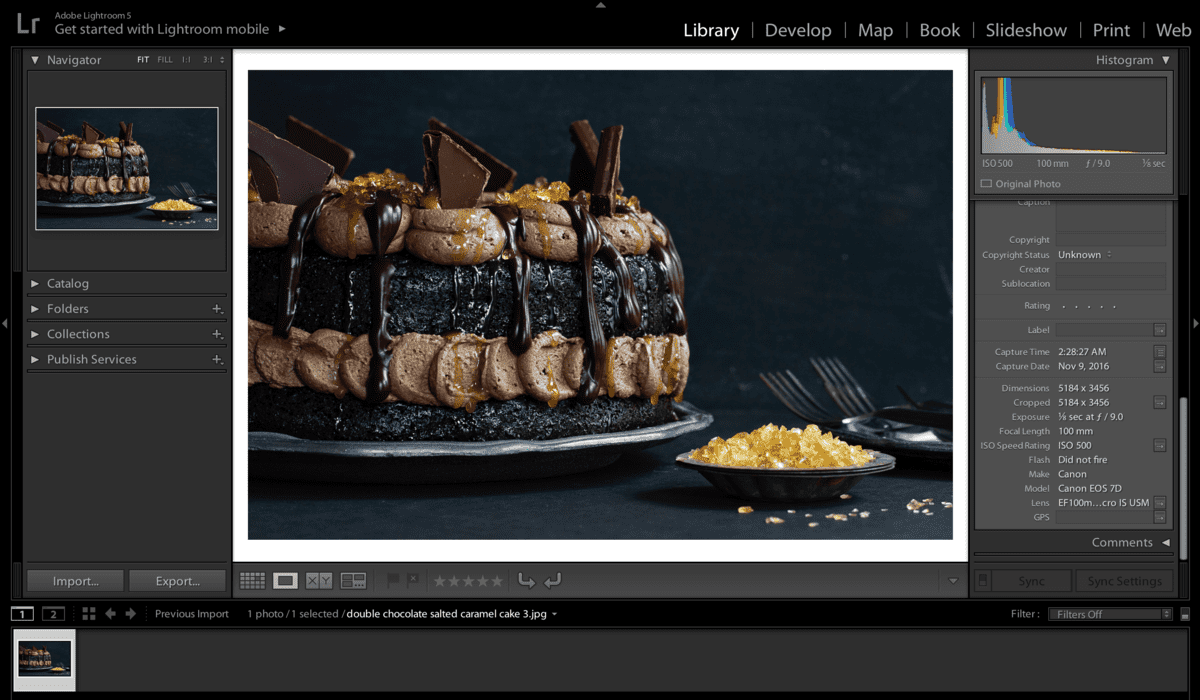
When I first started shooting, I knew things were looking a bit flat because I was shooting tethered in Lightroom (enabling me to see the photo on my laptop immediately after capturing it). Since things were definitely looking a bit too one-
dimensional, I adjusted the frosting a bit, added more drizzling ganache, and salted caramel sugar pieces for texture. The sugar pieces really seemed to grasp the light and added more dimension to the photos.
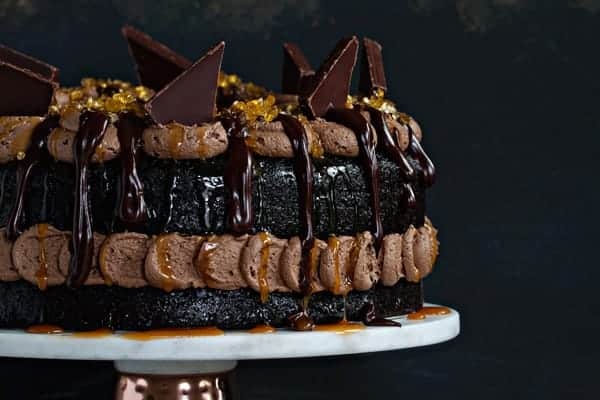
I attempted to shoot the cake on several cake stands, but eventually settled on a large, vintage metal plate. I used the matching dessert plates for the individual slices because I wanted continuity in the props for this shoot. Simple, slightly rustic, and of a single tone.
THE EDITS
I adjusted the exposure a bit in Lightroom and then switched over to Adobe Photoshop to further edit the photo.
I started with Auto Contrast (Image; Auto Contrast) – I find that this is a good starting point for overall sharpening and brightening naturally in all the right places.
It was still a little too dark, so I used Curves to adjust the lighting to be a little bit brighter. (Image; Adjustments; Curves) Drag the line up slightly. You can see the preview of the photo as you make this adjustment. Just pick a point in the line and start dragging upwards to lighten, or down to darken.
The frosting was casting a blue/green color, so I used the Color Balance tool to boost the magenta and red slightly (Image; Adjustments; Color Balance). Simply slide the Cyan/Red slider a few notches to the right for more red, and the Magenta/Green slider to the left a few notches to bump up the magenta.
Everything was still looking a little drab, so my last step was to bump up the saturation for richer color. (Image; Adjustments; Vibrance) You’ll be able to see your changes in preview, so simply move the saturation slider until you’re happy with the look of the photo.
I used Auto Contrast, Curves, Color Balance, and Vibrance. Auto Contrast is my go-to for hitting all the right notes in sharpening and contrast in one fell swoop. If my natural lighting was pretty good, this almost always boosts things in the right direction with the press of a button.
I’m sure there’s more than one way to improve the lighting of a photo, but I’ve used Curves for years, and find the graph and line movement so quick and easy, that it’s my go-to for this process.
I know you can use photo filters and even Hue/Saturation to do some of the things I accomplished with the combination of Color Balance and Vibrance, but I prefer the individual control these two separate tools give me.
FINAL THOUGHTS:
Sometimes photography will take you out of your comfort zone and that’s definitely a good thing, because it means you’re learning and pushing yourself.
By having access to tools like Adobe Lightroom and Photoshop, you know that you’ll be able to enhance your photos to achieve the look you’re after.
If you happen to read My Baking Addiction on a regular basis, you know that I’ve teamed up with Adobe to offer some basic food photography tips. If you didn’t read those posts and you’re interested in them, you can catch up on the series by checking out my cucumber gin fizz and cocktail photography post.
Double Chocolate Salted Caramel Cake
Ingredients
For the Cake:
- 2 cups sugar
- 1 ¾ cups all-purpose flour
- ¾ cup unsweetened cocoa powder
- 2 tablespoons King Arthur Flour Black Cocoa optional
- 2 teaspoons baking soda
- 1 teaspoon baking powder
- 1 teaspoon kosher salt
- 2 eggs
- 1 cup buttermilk
- 1 cup strong brewed black coffee
- ½ cup vegetable oil
- 2 teaspoons vanilla extract
For the Frosting:
- 1 cup unsalted butter softened
- 4 ounces semisweet chocolate melted and cooled
- 4 cups powdered sugar sifted
- 2 tablespoons unsweetened cocoa powder sifted
- 2 teaspoons vanilla extract
- 2-3 tablespoons milk
For the Ganache:
- 4 oz semisweet chocolate chopped into very small pieces
- ½ cup heavy whipping cream
- 1 teaspoon vanilla extract
- 1 tablespoon honey
To Decorate:
- ⅓ cup homemade salted caramel sauce
- salted caramel sugar pieces* optional
Instructions
- For the Cake
- Heat oven to 350°F. Grease and flour two 9-inch round baking pans or one 13x9x2-inch baking pan. Set aside.
- In the bowl of a stand mixer fitted with the whisk attachment or in a large bowl with an electric mixer, combine the sugar, flour, cocoa(s), baking soda, baking powder and salt. Mix on low speed until dry ingredients are thoroughly combined.
- Add eggs, buttermilk, coffee, oil and vanilla. Beat on medium speed for about two minutes; the batter will be thin.
- Pour batter evenly into prepared pans.
- Bake in preheated oven for 30 to 35 minutes for round pans, 35 to 40 minutes for rectangular pan or until wooden toothpick inserted in center comes out clean.
- Cool 10 minutes; remove from pans to wire racks. Cool completely.
- For the Frosting
- In the bowl of a stand mixer fitted with the paddle attachment, beat butter on medium-high speed for about 5 minutes.
- Spoon in cooled, melted chocolate (chocolate should feel cool to the touch, but still be melted. I usually cool mine for about 5 minutes) and mix on low speed to incorporate the melted chocolate. Scrape down the sides of the bowl as needed.
- Add in powdered sugar, cocoa, and vanilla and mix on low speed until combined.
- Turn the mixer back up to medium-high speed and beat for an additional 5 minutes. Add in milk, 1 tablespoon at a time until you reached the desired consistency.
- Place one cake layer on a cake stand or plate and frost the top of the cake with a little less than half of the frosting. Add the next layer and frost the top of the cake with the remaining frosting.
- If desired, top with salted caramel chocolate pieces.
- For the Ganache
- In a small saucepan over medium heat, warm the heavy cream until very hot, but not boiling.
- Place chocolate pieces in a heat safe bowl. Pour the hot cream over the chocolate and allow it to sit for about 5 minutes. Whisk the cream and chocolate until smooth and thoroughly combined. Whisk in the vanilla and honey. Allow to cool at room temperature for about 10 minutes. Do not let the glaze sit for too long or it will harden up before you spoon it over the frosting.
- Drizzle ganache and salted caramel sauce over the cake before serving. Refrigerate any leftover cake for up 3 days.
Notes
- The *salted caramel sugar pieces were purchased at World Market.
- The chocolate squares are Ghirardelli Chocolate Squares Dark & Sea Salt Caramel.
You may also like


WOW!!!!! I know people always say, “I’ve now found my go-to chocolate cake recipe” — but for real, this is IT!! This cake has it all. It is perfectly moist, satisfies the need for denseness while also being light and fluffy (figure that one out), and — it has chocolate flavor to the max.
AH-MAZ-ING.
I have been on the hunt forever — my search is over! Hoorayyyy!!! I just have to figure out how to use this recipe for cupcakes and I will be in total heaven!
THANK YOU!!!!! :)
I’m so glad to hear that, Rachael! You’re very welcome!
Thanks for this recipe, looking forward to trying it! Would the cake be sturdy enough for 4 layers? I’ve had a fail in the past with one that was fine as 2 but collapsed w 4….
Hi, Gwen! I’ve never tried it with four layers, so I honestly don’t know. You could always give it a try. If you do, let me know how it goes!
Hi there,
I made this recipe once, and IT IS AMAZING!!! Best chocolate cake EVER and my go-to recipe, SERIOUSLY!! I made layer cake and cupcakes and both were AMAZING!! Super moist and flavorful! My question is, how many cups is this recipe. I’m trying to make two 12 inch cakes and need to know what to multiply the recipe by without having too much left over. Would really appreciate the help!
Hi, Vaishali! I’ve found this cake conversion chart to be really helpful. Let me know if I can do anything else to help!
Thank you so much for posting this recipe, my kids ate the cake every night until it was gone.
I love that! Thank you!
Hi, this cake looks amazing. Do you use regular cocoa powder or dark cocoa powder?
Hi, Melissa! I used regular cocoa powder. I hope you enjoy it!
Si quiero hacer un pastel más grande, con el doble de los ingredientes, el polvo de hornear y el bicarbonato también se duplican? Y qué tiempo debe permanecer en el horno? Gracias
Hi, Yasy! By double, do you mean four layers or a bigger pan? If you decide to do four layers, I would double the recipe and put two layers in the oven first, let them bake, and then bake the remaining two. Let me know if I can help with anything else!
Hello,
Im not a coffee drinker so i dont have coffee to brew.
Ive used instant coffee crystals in other chocolate cake recipes.
Could I also use instant coffee for your chocolate cake recipe?
Thank you for a reply.
(*_*)
Chelle
Hi, Chelle! I would dissolve the coffee crystals in some water to give you the coffee in liquid form. I hope you enjoy it!
This looks so fantastic! Does this translate into cupcakes well or are there modifications that are required?
Hi, Jene! I haven’t tried these as cupcakes, but I think you should give it a try! Bake at 350 degrees for probably about 20-30 minutes. Let me know how it goes!
World Marker is not carrying the salted caramel sugar pieces any longer – have you found them anywhere else?
I’m so sorry, Ross, I haven’t. I will definitely keep an eye out for them though! If you find any, please let me know!
I just made the cake and frosting recipes for some mini loaf cakes as Christmas gifts. They turned out delicious!! Thank you for posting this recipe I will be using again and again. :)
Wonderful, Ann! I’m glad you liked it!
Wonderful, Ann! I’m glad you liked it!